At Vonage’s API department we’ve designed a collection of tools you might have come across as Communication API```. It allows you to do anything from sending/receiving SMS and phone calls, to creating video, audio, and text chats, all the way to the really “crazy” stuff like connecting a regular phone call to someone responding from a browser.
This article is not about Communication API. I will instead introduce you to a CLI tool called Conversation API function that will deeply simplify prototyping apps using Communication API, with as little config as possible.
If I have tingled your attention, and you want to get your hands in the dirt, visit https://github.com/jurgob/conversation-api-function and follow the instructions from there. You will have something up and running in less than 20 minutes (10 if you are a node developer).
If you have some extra time, make sure to also check out the examples and learn the variety of things this CLI allows you to do. You can stop reading here if you were just looking for a quick installation guide :).
But if you want to know something more about the why and the what of this CLI, keep reading on…
The Vonage configuration API fatigue
To test our communication API, you need to set up several things. let’s say you want to test how you can receive a voice call and say some text, and you want to do it locally. what you need to do is the following:
- register to Vonage and buy an LVN
- create an application
- configure your number to be connected to your application
- your “backend” is in your local machine as far as you are developing, so you need to expose this somehow with tools like Localtunnel.
- configure your application to hit your public Locatunnel address, so you can receive in your local application the Vonage events.
after you do this, you can test a scenario where you receive a phone call. Let’s say you want to try a PHONE to BROWSER scenario. That means you have to add the following steps:
- setup some frontend
- configure our SDK in your frontend
- typically set up some DB for storing some state of your business app.
Those steps are “easy” but not a little time-consuming, and the initial configuration and setup can be still pretty tricky for new developers.
Simplifying this is the main reason I wrote this tool.
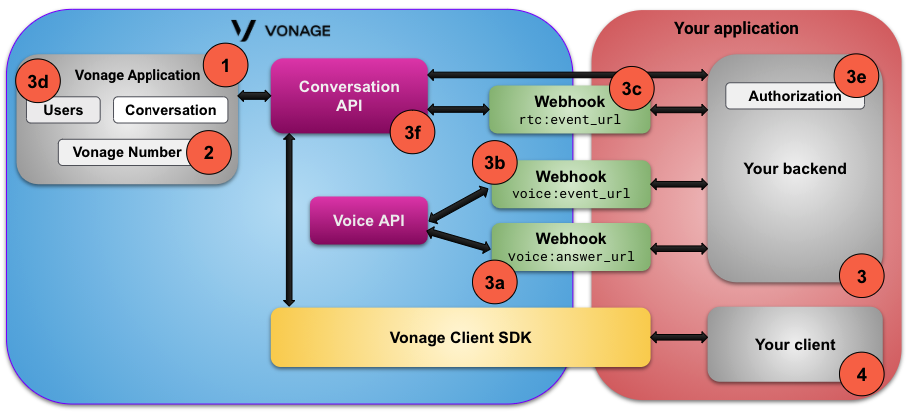
In the below picture, a schema of a typical app using Communication APIs, in this case using the so-called Conversation API and the Voice API. THere’s also a front end using the Client SDK:
What the tool is doing for me? the short version
This tool requires just some minimal configuration once, then you will be able to develop and execute those javascript examples, that from now on I’m gonna call conversation function, in a super-easy way, and they are gonna be testable in your local machine!.
Do you want to share an example with someone else? just publish it on Github, if another person wants to test it, he can just download it, eventually run `npm install` and run the example. You are gonna run the same code, but you will not share any data or information!.
You may already have everything you need at this point, and you may prefer digging into the examples rather than reading the rest of the article. It’s fine! do it! Possibly have fun and create a new example of a use case I still didn’t think about, I accept pull requests in the read me!
What the tool is doing for me?
note: again, you can use the tool without really knowing all of the following, but is gonna help you in a deeper understanding of the tool and the Vonage API itself.
In general, when you use our API, you need to do the following steps:
- The very first time, you need to create an account (e.g. My Company)
- once you’ve got an account, (with the related api_key and api_secret), you need to create an application (e.g: My Chat Application or My Telephony Support System)
- Once you create an application you get a private key, you need that to generate a JWT token.
- If you want to program an incoming call or incoming Facebook message(e.g. you want to say “hello” to everyone calling you), you need to have a Vonage phone number (so-called LVN, Long Virtual Number), and you need to bind it to your application. Also, you need to configure a set of webhook URLs with your back end URL in order to be notified about something that happened in your application (e.g. someone is calling your LVN number)
- if you are implementing the use case in step 4 and you want to test it locally, then you have to expose your laptop with some tool like Localtunnel or Ngrok and then update your application’s webhook in order to reach your laptop.
conversation-api-functions is gonna automatically run the steps 1/2/3 once you run the fist_config command. Every time you use run to execute your node function, steps 4 and 5 are gonna be done.
As soon as the first_config is creating a new Vonage application, this app is gonna be used for every conversation function you are gonna run on your laptop, and every device where you are gonna run that is gonna use a different application. That’s why if someone else is using your code, the data are not gonna be shared anyhow.
The anatomy of a conversation function
In the creation of this tool, I got inspired a lot from tools like AWS Lamda function , AWS SAM and Jamstack technologies and in particular Vercel.
All those things strive to let you focus only on what you are doing, without the need to be worried about details like “coding my infrastructure or “adding a CDN in front of my application” or “configure Webpack to split my Javascript code per page”. Those are concepts that you may ignore your all life and still be very successful in writing Next.js app in Vercel or lambda functions in ASW SAM.
in the same way, all you need to do when you write a conversation function is to write an index.js file where you export a js module that exports certain methods.
what those methods do, are documented here.
you may notice that excluding the handler route is a bit of an exception, every other handler has a 1:1 relationship with the webhook capabilities you can configure in your application. Check the Webhook types section in this link: https://developer.nexmo.com/application/overview, check for example the first row that shows voice property with and answer_url sub-property.
In the CLI you just need to implement the voiceAnswer handler, which is an express middleware.
As you can see you don’t need to be concerned about the part where you configure/update your Vonage app, or even spin up your express server.
In Conclusion
I’ve briefly introduced this new internal tool to quickly use the Vonage Communication API, if you have reached this part of the article, probably you now have a working example on your laptop and you’ve learned some notion about the Vonage API echo system. Your next step should now go in the Examples section here: https://github.com/jurgob/conversation-api-function#examples and see how many crazy things you can do!